17. CodeWarrior Reference


This chapter describes each menu command in the CodeWarrior IDE and the default key bindings for those commands. You can use this chapter as a convenient reference when you want to find information quickly.

The following information is discussed:


IDE Menu Reference

This section provides an overview of the menu commands in the CodeWarrior IDE.

There are several menus in the IDE's menu bar:


Windows

In Windows, the File Menu, Edit Menu, Search Menu, Project Menu, Debug Menu, Window Menu, and Help Menu are visible at all times.


Mac OS

In the Mac OS, the Apple Menu (Mac OS), File Menu, Edit Menu, Search Menu, Project Menu, Debug Menu, Window Menu, and Help Menu are visible at all times. If you activate ToolServer via the IDE Extras preference panel, then the Tools Menu (Mac OS) is also visible at all times.

The Version Control System (VCS) Menu is displayed only if you have installed and configured your CodeWarrior product to work with a compatible revision control system that you purchased separately. To learn more about revision control systems, and how to use them with CodeWarrior, refer to the documentation that came with the additional revision control software.

The Data Menu, Browser Menu, and Layout Menu are displayed when a window that can use their respective commands is present on the screen.


Menus for Mac OS only

The Tools Menu (Mac OS) appears if ToolServer is active. The Scripts Menu (Mac OS) and Editor Extensions Menu (Mac OS) are displayed when you set the correct preferences in the Preferences window. Refer to "IDE Extras" on page 254 for more information on how to do this.

In addition, you can make the commands that appear in many menus change by holding down the Option or Shift keys when pulling the menu down.

The text of some menu commands may change depending on the context of the action, or actions, performed.

Many menu commands can also have button equivalents on the toolbars. To learn more about how to customize the toolbars, refer to "Customizing the IDE" on page 289.


File Menu

The File Menu contains commands you use when opening, creating, saving, closing, and printing existing or new source code files and projects. The File Menu also provides different methods for saving edited files.


New Text File

Creates a new editable text file.

To learn more about this command, refer to "Creating a New File" on page 107 for more information.


New

Opens the New dialog box. This dialog box helps you create various items in the CodeWarrior IDE.


Open

Allows you to open an existing file.

To learn more about this command, refer to "Opening Files from the File Menu" on page 108.


Open Recent

Exposes a submenu of projects and files that were recently opened. You can choose a file from the submenu to instantly open that item.

If two or more files in the submenu have identical names, the full paths to those files are displayed in order to distinguish them.

To learn more about this command, refer to "Opening Files from the File Menu" on page 108.


Find and Open File

Opens an existing file, searching the current access paths as specified in the Access Paths panel of the Target Settings window.

See "Opening Files from an Editor Window" on page 113 for more information.


Find and Open `Filename'

Opens an existing text file, using the currently selected text in the editor window as the target file name.

See "Opening Files from an Editor Window" on page 113 for more information.


Close

Closes the active window.

See "Closing a File" on page 121 for more information.

To learn how to close all open editor windows, refer to "Closing All Files" on page 123.


Close All

Closes all open windows of a certain type. The menu command is based on the type. For example, when several editor windows are currently open and one of them is selected, the menu command is Close All Editor Documents.

To learn more about this topic, refer to "Closing All Files" on page 123.


Save

Saves the contents of the active window to disk.

For more information on this topic, refer to "Saving one file" on page 115.


Save All

Saves all editor files that are currently open.

For more information on this topic, refer to "Saving all files" on page 116.


Save As

Saves the contents of the active window to disk under another name of your choosing.

For more information, see "Renaming and saving a file" on page 116.


Save A Copy As

Saves the active window in a separate file. This command operates in different ways, depending on the active window.

For more information, see "Backing up files" on page 118.


Revert

Reverts the active editor window to its last saved version.

To learn more about reverting a file, see "Reverting to a Previously-Saved File" on page 125.


Import Components

Imports components from another catalog for use with the current catalog.

For more information about this command, see "Component Catalog Toolbar" on page 532.


Close Catalog

Closes the current catalog and removes it from the Component Catalog window and the Component Palette.

For more information about this command, see "Component Catalog Toolbar" on page 532.


Import Project

Imports an extensible markup language (XML) file into the IDE so you can save the XML file as a CodeWarrior project. The IDE prompts you to choose a name and location to save the new project file.

For more information, see "Importing and Exporting a Project" on page 102.


Export Project

Exports a CodeWarrior project to extensible markup language (XML) format. The IDE prompts you to choose a name and location to save the new XML file.

To learn more, see "Importing and Exporting a Project" on page 102.


Print Setup (Windows)

Sets the options used when printing files from the CodeWarrior IDE.

For more information about this command, see "Setting Print Options" on page 123.


Page Setup (Mac OS)

Sets the options used when printing files from the CodeWarrior IDE.

For more information about this command, see "Setting Print Options" on page 123.


Print

Prints files from the CodeWarrior IDE on your printer.

For more information on printing files, see "Printing a Window" on page 124, or read the documentation that came with your printer.


Exit (Windows)

Exits the CodeWarrior IDE immediately, provided one of the following conditions has been met:

If a Project window is open, all changes to the project file are saved before the IDE exits. If an Editor window is open and changes have not been saved, the CodeWarrior IDE asks if you want to save the changes before exiting.


Quit (Mac OS)

Quits the CodeWarrior IDE immediately, provided one of the following conditions has been met:

If a Project window is open, all changes to the project file are saved before the IDE quits. If an Editor window is open and changes have not been saved, the CodeWarrior IDE asks if you want to save the changes before quitting.


Edit Menu

The Edit menu contains all the customary editing commands, along with some CodeWarrior additions. This menu also includes the commands that open the Preferences and Target Settings windows.


Undo

The text of this menu command varies depending on the most recent action, and your Editor options settings.

Undo reverses the effect of your last action. The name of the Undo command varies depending on the type of operation you last executed. For example, if you have just typed in an open Editor window, the Undo command is renamed Undo Typing. Choosing the Undo Typing command will remove the text you have just typed.

To learn more about this topic, refer to "Undoing the last edit" on page 152, and "Undoing and redoing multiple edits" on page 152.

If you don't have Use multiple undo turned on in the Editor Settings preference panel, the Undo command toggles between Undo and Redo. To learn more about how to configure this option, refer to "Editor Settings" on page 269.


Redo, Multiple Undo, and Multiple Redo

Once an operation has been undone, it may be redone. For example, if you select the Undo Typing command, the command is changed to Redo Typing. Choosing this command overrides the previous undo.

If you have Use multiple undo turned on in the Editor Settings preference panel, you have more flexibility with regard to Undo and Redo operations. Choose Undo multiple times to undo multiple actions. Choose Redo multiple times to redo multiple actions.

To learn more about undo operations, refer to "Undoing the last edit" on page 152, and "Undoing and redoing multiple edits" on page 152.

To learn about how to configure multiple undo, refer to "Editor Settings" on page 269.


Cut

Deletes the selected text and puts it in the system Clipboard, replacing the contents of the Clipboard.


Copy

Copies the selected text in the active Editor window onto the system Clipboard. If the Message Window is active, the Copy command copies all the text in the Message Window onto the Clipboard.


Paste

Pastes the contents of the system Clipboard into the active Editor window.

The Paste command replaces the selected text with the contents of the Clipboard. If no text is selected, the Clipboard contents are placed after the text insertion point.

If the active window is the Message Window, the Paste command is dimmed and cannot be executed.


Clear

Deletes the selected text without placing it in the system Clipboard. The Clear command is equivalent to pressing the Delete or Backspace key.


Select All

Selects all the text in the active window. This command is usually used in conjunction with other Edit menu commands such as Cut, Copy, and Clear.

To learn more about selecting text, refer to "Selecting Text" on page 148.


Balance

Selects the text enclosed in either parentheses (), brackets [], or braces {}. For a complete procedure on how to use this command and how to balance while typing, consult "Balancing Punctuation" on page 150.


Shift Left

Shifts the selected source code one tab size to the left. The tab size is specified in the Preferences window.

To learn more about this feature, refer to "Shifting Text Left and Right" on page 151.


Shift Right

Shifts the selected source code one tab size to the right.

To learn more about this feature, refer to "Shifting Text Left and Right" on page 151.


Insert Reference Template (Mac OS)

Inserts a routine template corresponding to the selected Mac OS Toolbox call in the active window. The CodeWarrior IDE uses the online reference database application selected in the Find Reference Using pop-up menu to search for the routine's definition.

To learn about configuring the online reference database application and the Find Reference Using pop-up menu, refer to "IDE Extras" on page 254.


Preferences

Use this command to change the global preferences for the CodeWarrior IDE.

To learn more about configuring preferences, refer to "Choosing Preferences" on page 252.


Target Settings

Use this command to display the Target Settings window where you can change settings for the active build target. Note that the name of this menu command will vary depending on the name of your current build target.

To learn more about the Settings window, refer to "Choosing Target Settings" on page 318. To learn how to change the current build target, refer to "Set Default Target" on page 618.


Version Control Settings

This menu command displays the Version Control System options panel. To learn more about this panel, refer to the section of this manual entitled "Using CodeWarrior IDE with Version Control Systems" on page 581

If this command is not enabled, you do not have a revision control system configured for use with the CodeWarrior IDE.


Commands & Key Bindings

This command displays the Customize IDE Commands window.


Search Menu

The Search Menu contains all the necessary commands used to find text, replace text, and compare files. There are also some commands for code navigation.


Mac OS

Use the commands in this menu to find the definitions of routines in your source code and in a library reference database like THINK Reference or Apple Macintosh Programmer's Toolbox Assistant.


Find

Opens the Find dialog box which is used to find and/or replace the occurrences of a specific string in one or many files.

To learn more about the Find window and its capabilities, refer to "Guided Tour of the Find Dialog Box" on page 165.


Find Next

Finds the next occurrence of the Find text box string in the active window. This is an alternative to clicking the Find button in the Find dialog box.

To learn more about this feature, refer to "Finding Search Text" on page 178.


Find Previous

Find Previous operates the same way as Find Next, except that it finds the previous occurrence of the Find text box string.

To learn more about this feature, refer to "Finding Search Text" on page 178.


Find in Next File

Finds the next occurrence of the Find text box string in the next file listed in the Multi-File Search portion of the Find window (as exposed by the Multi-File Search Disclosure triangle in the Find window). This is an alternative to using the Find window. If the Multi-File Search button is not enabled as shown in Figure 6.3 on page 171, this command is dimmed.

To learn more about this feature, refer to "Finding and Replacing Text in Multiple Files" on page 185.


Find in Previous File

This command operates in much the same way as Find in Next File. The Find in Previous File command begins at the end of the previous file in the file list and searches for the next occurrence of the Find text box string.

To learn more about this feature, refer to "Finding and Replacing Text in Multiple Files" on page 185.


Enter `Find' String

This command copies the selected text in the active window into the Find text box, making it the search target string. This is an alternative to copying text and pasting it into the Find window.

To learn how to select text, refer to "Selecting Text" on page 148.


Enter `Replace' String

This command copies the selected text in the active window into the Replace text box, making it the replacement string. This is an alternative to selecting the string and copying it into the Find window.

To learn more about replacing text, refer to "Replacing Found Text" on page 182.


Find Selection

Finds the next occurrence of the selected text in the active text editor window.

To learn more about this feature, refer to "Finding Search Text" on page 178.


Find Previous Selection

This command finds the previous occurrence of the selected text in the active text editor window.

To learn more about this feature, refer to "Finding Search Text" on page 178.

To learn how to select text, refer to "Selecting Text" on page 148.


Replace

This command replaces the selected text in the active window with the text string in the Replace text box of the Find window. If no text is selected in the active editor window, this command is dimmed.

This command is useful if you wish to replace one instance of a text string without having to open the Find window. For example, say that you have just replaced all the occurrences of the variable "icount" with "jcount". While scrolling through your source code, you notice one instance of the variable "icount" is misspelled as "icont". To replace this variable with "jcount", select "icont" and choose the Replace command from the Search Menu.

To learn more about replacing text, refer to "Replacing Found Text" on page 182.

To learn how to select text, refer to "Selecting Text" on page 148.


Replace & Find Next

This command replaces the selected text with the string in the Replace text box of the Find window, and then performs a Find Next. If no text is selected in the active editor window and there is no text in the Find text box string field of the Find window, this command is dimmed.

To learn more about replacing text, refer to "Replacing Found Text" on page 182.

To learn how to select text, refer to "Selecting Text" on page 148.


Replace & Find Previous

This command operates the same way as Replace & Find Next except that it performs a Find Previous after replacing text.


Replace All

Finds all the occurrences of the Find string and replaces them with the Replace string. If no text is selected in the active editor window and there is no text in the Find text box in the Find dialog box, this command is dimmed.


Find Definition

This command searches for the definition of the routine name selected in the active window. Searching occurs in the source files belonging to the open project. If the definition is found, the CodeWarrior IDE opens the source code file where the routine is defined and highlights the routine name.

If the CodeWarrior IDE finds more than one definition, a Message window appears warning you of multiple definitions. For more information on the Message window, consult "Using the Message Window" on page 376.

If no definition is found, a system beep sounds.


Find Reference (Mac OS)

This command searches for the definition of the routine name selected in the active editor window using the online help system specified in the IDE Extras preference panel.

Searching takes place in QuickHelp, QuickView, THINK Reference version 2.x, or Toolbox Assistant.

If no definition is found, a system beep sounds.

For more information about choosing an online reference database, refer to "IDE Extras" on page 254.

To learn more about online databases, refer to "Online References" on page 158.


Find Definition & Reference (Mac OS)

This command searches for the definition of the routine name selected in the active editor window. Searching starts within the source code files belonging to the open project.

To use this command, first select a routine name. Then hold down the Option key and choose Find Definition & Reference from the Search Menu.

If the routine definition is not found within the project files, searching continues in QuickHelp, QuickView, THINK Reference version 2.x, or Toolbox Assistant.

If no definition is found, a system beep sounds.

For more information about choosing an online reference database, refer to "IDE Extras" on page 254.

To learn more about online databases, refer to "Online References" on page 158.


Go Back

This command returns you to the previous view in the Browser.

To learn more about this feature, refer to "Go Back and Go Forward" on page 242.


Go Forward

This command moves you to the next view in the Browser (after you have used the Go Back command to return to a previous view).

Refer to "Go Back and Go Forward" on page 242 for more information.


Go To Line

Opens a dialog box (in which you enter a line number) and then moves the text insertion point to the line number you specify.

For more information about this feature, refer to "Going to a Particular Line" on page 157.


Compare Files

Opens a dialog box to choose two files or folders to compare and merge. After choosing files to compare, a file comparison window appears, showing differences between the two files. If two folders are compared, the differences between the folders are shown in the Compare Folders window. For more information, see "Comparing and Merging Files & Folders" on page 125.


Apply Difference

Adds, removes, or changes text in the destination file shown in a file comparison window that is different from the text in the comparison window's source file.


Unapply Difference

Reverses the action of an Apply Difference command in a file comparison window.


Project Menu

The Project menu lets you add and remove files and libraries from your project. It also lets you compile, build, and link your project. All of these commands are covered in this section.


Add Window

This command adds the file in the active Editor window to the open project.

To learn more about this feature, refer to "Using the Add Window command" on page 84.


Add Files

This menu command adds files to the Project window.

To learn more about this feature, refer to "Using the Add Files command" on page 79.


Create New Group

The Create New Group command allows you to create a new group in the current project. This command is present in the Project menu if the Files category is selected in the current project window.

For more information about creating groups, refer to "Creating Groups" on page 86.


Create New Target

The Create New Target command allows you to create a new build target for the current project. This command is present in the Project menu if the Targets category is selected in the current project window.

For more information about creating targets, refer to "Working with Complex Projects" on page 90.


Create New Segment (Mac OS)

The Create New Segment command allows you to create a new segment (also referred to as a group of files) in the current Mac OS 68K project. This command is in the Project menu if the Segments category is selected in the current project window.

For more information about managing segments, refer to "Managing Files in a Project" on page 74.


Remove Selected Items

This menu command removes the currently selected items from the Project window. To learn more about removing items from the Project window, refer to "Managing Files in a Project" on page 74.


WARNING!

This command cannot be undone.

Check Syntax

This command checks the syntax of the source code file in the active Editor window or the selected file(s) in the open Project window. If the active Editor window is empty, or no project is open, this command is dimmed.

Check Syntax does not generate object code. This command only checks the source code for syntax errors. The progress of this operation is tracked in the Toolbar's message area.

To abort this command at any time, press Esc (Windows) or Command-Period (Mac OS).

If one or more errors are detected, the Message window appears. For information on how to correct compiler errors, consult "Correcting Compiler Errors and Warnings" on page 379.


Preprocess

This command performs preprocessing on selected source code files in any language that has a preprocessor, including C, C++, and Pascal.

To learn more about this command, refer to "Preprocessing Source Code" on page 372.


Precompile

This command precompiles the text file in the active Editor window into a precompiled header file.

To learn more about this topic, refer to "Using Precompiled or Preprocessed Headers" on page 365.


Compile

This command compiles selected files. If the project window is active, the selected files and segments/groups are compiled. If a source code file in an Editor window is active, the source code file is compiled. The source code file must be in the open project.

To learn more about this topic, refer to "Compiling and Linking a Project" on page 357.


Disassemble

This command disassembles the compiled source code files selected in the project window, and displays object code in new windows with the title of the source code file and the extension .dump.

To learn more about this feature, refer to "Disassembling Source Code" on page 373.


Bring Up To Date

This command updates the open project by compiling all of its modified and "touched" files.

To learn more about this topic, refer to "Updating a Project" on page 360.


Make

This command builds the selected project by compiling and linking the modified and "touched" files in the open project. The results of a successful build depend on the selected project type.

To learn more about this topic, refer to "Making a Project" on page 360.


Stop Build

This command halts the build currently in progress.

To learn more about this topic, refer to "Compiling and Linking a Project" on page 357.


Remove Object Code

This command removes all compiled source code binaries from the open project. The numbers in the Code column and Data column of each file are reset to zero.

To learn more about this topic, refer to "Removing Object Code" on page 363.


Remove Object Code & Compact

This command removes all binaries from the project and compacts it. Compacting the project removes all binary and debugging information and retains only the information regarding the files that belong to the project and project settings.

To learn more about this topic, refer to "Removing Object Code" on page 363.


Re-search for Files

To speed up builds and other project operations, the IDE caches the locations of project files after it has found them in the access paths. Re-search for Files forces the IDE to forget the cached locations of files and re-search for them in the access paths. This command is useful if you have moved files around on disk and want the IDE to find them in their new locations.

If the Save project entries using relative paths setting is enabled the IDE does not reset the relative path information stored with each project entry, so re-searching for files will find the source files in the same location (the exception is if the file no longer exists in the old location). In this case the IDE will only re-search for header files. To force the IDE to also re-search for source files, you must first select Reset Project Entry Paths.

If the Save Project Entries Using Relative Paths setting is disabled, the IDE will re-search for both header and source files.


Reset Project Entry Paths

This command resets the location information stored with each project entry when the Save project entries using relative paths setting is enabled. The next time the project entries are accessed, the IDE will re-search for the project entries in the access paths. This command does nothing if the Save Project Entries Using Relative Paths setting is disabled.


Synchronize Modification Dates

This command updates the modification dates stored in the project file. It checks the modification date for each file in the project, and if the file has been modified since it was last compiled, the CodeWarrior IDE marks it for recompilation.

To learn more about this topic, refer to "Synchronizing modification dates" on page 90.


Enable Debugger

Use these commands to change allowances for project debugging. The Enable Debugger command sets preferences to allow your project to be debugged. The Disable Debugger sets preferences so no debugging can occur.


Mac OS

When you choose the Enable Debugger command, the Run command changes to Debug and lets the debugger launch and debug your project. When you choose the Disable Debugger command, the Run command runs your project normally.

To learn more about this topic, refer to "Controlling Debugging in a Project" on page 103.


Disable Debugger

Use these commands to change allowances for project debugging. The Enable Debugger command sets preferences to allow your project to be debugged. The Disable Debugger sets preferences so no debugging can occur.

To learn more about this topic, refer to "Controlling Debugging in a Project" on page 103.


Run

This command compiles, links, creates a stand-alone application, and launches that application.


Windows

If the project type is set as a library or a shared library, then the Run command is dimmed.


Mac OS

If the project type is set as a code resource, library, MPW Tool, or shared library, then the Run command is dimmed. Press the Option key to change this command to Debug.

To learn more about this topic, refer to "Running a Project" on page 361.


Resume (Mac OS)

This command appears in the Project menu when the application created by the CodeWarrior IDE is running already. You choose this command to switch into the application from the CodeWarrior IDE.


Debug

This menu command compiles and links your project and then opens the project's debugger file in the debugger. This command runs the debugger for any project that the debugger can work with.


Mac OS

This command appears in the Project menu when you press the Option key to change the Run command to Debug, or when the debugger is enabled.


Set Default Project

This menu command selects which project is the default project. To learn more about what a default project is, refer to "Choosing a Default Project" on page 73.


Set Default Target

This menu command allows you to choose a different target within the current project to work with. This menu command might be useful if you want to switch between multiple targets in a project and do a build for each one.


Debug Menu

The Debug menu contains commands that allow you to manage program execution. All of these commands are available in both the integrated and external debuggers. There is also a submenu for customizing breaks for Java exceptions.


Kill

Permanently terminates execution of the target program and returns control to the IDE.


Restart

Restarts the debugging session.


Reset (Embedded)

Resets the program and returns control to the IDE.


Hard Reset (Embedded)

Resets the program and also resets the hardware before returning control to the IDE.


Step Over

Executes a single statement, stepping over function calls.


Step Into

Executes a single statement, stepping into function calls.


Step Out

Executes the remainder of the current function until it exits to its caller.


Stop

Temporarily suspends execution of the target program and returns control to the debugger.


Set Breakpoint

Sets a breakpoint at thecurrently-selected line. This command toggles between Set Breakpoint and Clear Breakpoint, depending on whether you have a breakpoint currently set in a line.

If you have your editor window set up to show breakpoints (by choosing Debug -> Show Breakpoints), you will see the breakpoints column on the left side of the editor window. If you set a breakpoint in a certain line of code, a marker appears in the breakpoints column next to that line. If you clear an existing breakpoint from a certain line, the marker to the left of that line disappears from the breakpoints column.


Clear Breakpoint

Clears the breakpoint at thecurrently-selected line. This command toggles between Set Breakpoint and Clear Breakpoint, depending on whether you have a breakpoint currently set in a line.

If you have your editor window set up to show breakpoints (by choosing the Show Breakpoints command from the Debug menu), you will see the breakpoints column on the left side of the editor window. If you set a breakpoint in a certain line of code, a marker appears in the breakpoints column next to that line. If you clear an existing breakpoint from a certain line, the marker to the left of that line disappears from the breakpoints column.


Enable Breakpoint

Enables the breakpoint at thecurrently-selected line. This command toggles between Enable Breakpoint and Disable Breakpoint, depending on whether you have a breakpoint currently enabled in the line.

If you have your editor window set up to show breakpoints (by choosing Debug > Show Breakpoints), you will see the breakpoints column on the left side of the editor window. Darkened markers in the breakpoints column indicate enabled breakpoints. Dimmed markers indicate disabled breakpoints.


Disable Breakpoint

Disables the breakpoint at thecurrently-selected line. This command toggles between Enable Breakpoint and Disable Breakpoint, depending on whether you have a breakpoint currently enabled in the line.

If you have your editor window set up to show breakpoints (by choosing Debug -> Show Breakpoints), you will see the breakpoints column on the left side of the editor window. Darkened markers in the breakpoints column indicate enabled breakpoints. Dimmed markers indicate disabled breakpoints.


Clear All Breakpoints

Clears all breakpoints in all source-code files belonging to the target program.


Show Breakpoints

Displays the breakpoints column, which appears in editor windows to the left of the source code. This command toggles between Show Breakpoints and Hide Breakpoints, depending on whether the breakpoints column is currently visible on the active editor window.


Hide Breakpoints

Hides the breakpoints column, which appears in editor windows to the left of the source code. This command toggles between Show Breakpoints and Hide Breakpoints, depending on whether the breakpoints column is currently visible on the active editor window.


Set Watchpoint

Sets a watchpoint for the selected variable or range of memory. This command toggles between Set Watchpoint and Clear Watchpoint, depending on whether the watchpoint is currently set in the active editor window.

The watchpoint is indicated by an underline. You can configure the color of this underline using the Display Settings preference panel in the IDE Preferences window. For more information, refer to "Display Settings" on page 279.


Clear Watchpoint

Clears a watchpoint for the selected variable or range of memory. This command toggles between Set Watchpoint and Clear Watchpoint, depending on whether the watchpoint is currently set in the active editor window.

The watchpoint is indicated by an underline. You can configure the color of this underline using the Display Settings preference panel in the IDE Preferences window. For more information, refer to "Display Settings" on page 279.


Enable Watchpoint

Enables a watchpoint for the selected variable or range of memory. This command toggles between Enable Watchpoint and Disable Watchpoint, depending on whether you have a watchpoint currently enabled.

Enabled watchpoints are indicated by an underline for the selected variable or range of memory. Disabled watchpoints do not have the underline. The underline's color can be configured in the Display Settings preference panel of the IDE Preference window. See "Display Settings" on page 279. for more information.


Disable Watchpoint

Disables a watchpoint for the selected variable or range of memory. This command toggles between Enable Watchpoint and Disable Watchpoint, depending on whether you have a watchpoint currently enabled.

Enabled watchpoints are indicated by an underline for the selected variable or range of memory. Disabled watchpoints do not have the underline. The underline's color can be configured in the Display Settings preference panel of the IDE Preference window. See "Display Settings" on page 279. for more information.


Clear All Watchpoints

Clears all watchpoints in the current program.


Break on C++ Exception

Causes the debugger to break at __throw() every time a C++ exception occurs.


Break on Java Exceptions

This menu item causes the Java Exceptions submenu to appear. To learn more about this submenu, refer to "Java Exceptions Submenu" on page 633.


Switch to Monitor

Gives control to an external debugger that you may have installed on your computer.


Mac OS

The low-level Macintosh ROM Monitor program and MacsBug are two examples of external debuggers.


Data Menu

The Data menu lets you control how data values are displayed in the debugger. All of these commands are available in both the integrated and external CodeWarrior debuggers. This menu is present anytime a window that can employ the Data commands is frontmost on the screen. Otherwise, it is hidden from view.


Show Types

Shows the data types of all local and global variables displayed in the active variable pane or variable window.


New Expression

Creates a new entry in the Expressions window, prompting you to enter a new expression.


Copy to Expression

Copies the variable selected in the active pane to the Expressions window. You can also drag an expression to the Expressions window from source code or from another window or pane.


View As

Displays a selected variable as a value of a specified data type.


View Variable

Creates a separate window to display a selected variable.


View Array

Creates a separate window to display a selected array.


View Memory

Displays the contents of memory as a hexadecimal/ASCII character dump.


View Memory As

Displays the memory a selected variable occupies or a selected register points to.


Default

Displays the selected variable in its default format based on the variable type.


Signed Decimal

Displays the selected variable as a signed decimal value.


Unsigned Decimal

Displays the selected variable as an unsigned decimal value.


Hexadecimal

Displays the selected variable as a hexadecimal value.


Character

Displays the selected variable as a character value.


C String

Displays the selected variable as a C character string.


Pascal String

Displays the selected variable as a Pascal character string.


Unicode String

Displays the selected variable as a Unicode character string.


Floating Point

Displays the selected variable as a floating-point value.


Enumeration

Displays the selected variable as an enumeration.


Fixed (Mac OS)

Displays the selected variable as a numerical value of type Fixed.


Fract (Mac OS)

Displays the selected variable as a numerical value of type Fract.


Browser Menu

The Browser menu lets you create new classes, member functions, and data members in the active project. This menu is present when a window that can employ the Browser commands is open. Otherwise, the menu is hidden from view.


New Class

Displays a dialog box to help you create a new class for your project.


New Member Function

Displays a dialog box to help you create a new member function for your project.


New Data Member

Displays a dialog box to help you create a new data member for your project.


New Property

Displays a dialog box to help you create a new property for a selected class in your project.


New Method

Displays a dialog box to help you create a new method for a selected class in your project.


New Event Set

Displays a dialog box to help you create a new event set for a selected class in your project.


New Event

Displays a dialog box to help you create a new event for a selected class in your project.


Window Menu

The Window menu includes commands that tile open editor windows, switch between windows, and open debugger windows. There is also a submenu for customizing the toolbars.


Stack Editor Windows

This command opens all editor windows to their full screen size and stacks them one on top of another, with their window titles showing. This command is dimmed when the active window is the Project window or Message window.


Tile Editor Windows

This command arranges all editor windows so that none overlap. This command is dimmed when the active window is the Project window or Message window.


Tile Editor Windows Vertically

This command arranges all editor windows so that none overlap. Additionally, the windows are oriented vertically across the screen.


Tile Vertical

This command arranges all the Editor windows in a single row.

This command is disabled when the active window is the Project window or Message window.


Mac OS

ToolServer Worksheets also disable this command.


Zoom Window

This menu command expands the active window to the largest possible size. If you choose the menu command again, the window returns to its original size.


Minimize Window (Windows)

Minimizes the currently active window.


Collapse Window (Mac OS)

Collapses the currently active window.


Restore Window (Windows)

Restores a window to its original size.


Expand Window (Mac OS)

Expands a window to its original size.


Save Default Window

This command saves the settings of the active browser window, so that the next time you open a browser window, the CodeWarrior IDE opens it with the saved settings.

To learn more about this command, refer to, "Saving Editor Window Settings" on page 144, or "Saving a Default Browser" on page 247.


Toolbar

This menu item causes the Toolbar submenu to appear. To learn more about this submenu, refer to "Toolbar Submenu" on page 633.


Browser Contents

This command displays the Browser Contents Window. This menu command is dimmed when the Browser is not activated.

To learn more about this feature, refer to "Contents Window" on page 213. To learn how to activate the Browser, refer to "Activating the Browser" on page 205.


Class Hierarchy Window

This command displays the Browser's Multi-Class Hierarchy Window. This menu command is dimmed when the Browser is not activated.

To learn more about this feature, refer to "Multi-Class Hierarchy Window" on page 221.

To learn how to activate the Browser, refer to "Activating the Browser" on page 205.


New Class Browser

This command displays the Browser's Browser Window. This menu command is dimmed when the Browser is not activated.

To learn more about this feature, refer to "Browser Window" on page 214.

To learn how to activate the Browser, refer to "Activating the Browser" on page 205.


Build Progress Window

This menu command displays the progress window for builds, as shown in Figure 10.1 on page 358.


Errors & Warnings Window

This command displays the Errors and Warnings window.

To learn more about this window, refer to "Guided Tour of the Message Window" on page 373. Also, refer to "Using Batch Searches" on page 184.


Project Inspector

This menu command allows you to view information about your project and enable debug information generation.

To learn more about this command's window, refer to "Guided Tour of the Project Window" on page 42.


ToolServer Worksheet (Mac OS)

Displays the ToolServer Worksheet window. This window is used in conjunction with ToolServer. This command is disabled provided one of the following conditions have been met:

To learn more about ToolServer, refer to Targeting Mac OS.


Processes Window

Displays the Processes window.


Expressions Window

Displays the Expressions window.


Global Variables Window

Displays the Global Variables window. Within this window you can view the global variables for the entire project or those contained in a file. Click on a file name in the Files list to display the file's global variables in the Variables list.


Breakpoints Window

Displays the Breakpoints window.


Watchpoints Window

Displays the Watchpoints window.


Registers Windows

Displays the Registers submenu, from which you can choose to view general registers or FPU registers.


Component Catalog

Displays the Component Catalog window for use with RAD projects.


Component Palette

Displays the Component Palette for use with RAD projects.


Object Inspector

Displays the Object Inspector for use with RAD projects.


Other Window Menu Items

The other Window menu items depend solely on which project, source files, header files, interface files, and other windows you have open.

All of the open windows are shown in this menu and the first nine files (1 through 9) are given key equivalents. The current project is always assigned the number 0 (zero). Press Ctrl/Command and a number to open a specific Editor window. A check mark is placed beside the active window.


Mac OS

A file whose modifications have not been saved is underlined.

To make one of your open CodeWarrior files active and bring its window to the front, do one of the following:


Layout Menu

The Layout menu includes commands that manipulate objects in a rapid application development (RAD) layout window. This menu is present when a window that can employ the Layout commands is open. Otherwise, the menu is hidden from view.


Group

Combines selected objects so that they move together as a group.


Ungroup

Separates a selected group so you can move each object independently.


Send To Back

Moves the selected objects so that they are displayed behind all other objects.


Bring To Front

Moves the selected objects so that they are displayed in front of all other objects.


Display Grid

When checked, displays the graphical grid in the layout window.


Snap To Grid

When checked, the Layout editor automatically aligns objects with the graphical grid.


Align To Grid

Positions selected objects so that they are aligned with a graphical grid in the layout window. This grid can be displayed or hidden from view.


Version Control System (VCS) Menu

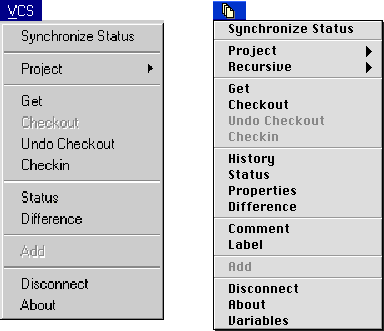
The Version Control System (VCS) menu, shown in Figure 17.1, may appear in the menu bar of your CodeWarrior IDE if you have purchased the MW Visual SourceSafe for Macintosh Version Control System (available separately) for use with the CodeWarrior IDE.

To learn how to configure MW Visual SourceSafe to use revision control with your projects, refer to the documentation for your MW Visual SourceSafe product.

Figure 17.1 VCS menus for Windows and Mac OS


Help Menu

Online help is available from the Help menu. When you are working in the CodeWarrior IDE, select one of the items to get interactive, online help.


CodeWarrior Help

Displays help for using the CodeWarrior.


How to

Displays step-by-step help topics.


Glossary

Displays a list of vocabulary terms.


IDE

Displays help for using the IDE.


Debugger

Displays help for using the debugger.


Error Reference

Displays help for referencing IDE errors.


C/C++ Compiler Reference

Displays help for the C/C++ compilers.


MSL C Reference

Displays help for the Metrowerks Standard Library (MSL) for C.


MSL C++ Reference

Displays help for the Metrowerks Standard Library (MSL) for C++.


Other

Displays other information specific to your CodeWarrior product.


About Metrowerks (Windows)

Displays the Metrowerks About Box.


Java Exceptions Submenu

The Debug Menu has another submenu under it for the Break on Java Exceptions command. The Java Exceptions submenu contains options that tell the debugger what to do when Java exceptions occur. This command is available when you are working with Java source code, and is dimmed for all other source code.


All Exceptions

This menu command causes the debugger to break every time an exception occurs. This includes exceptions thrown by the virtual machine, your own classes, the debugger, classes in classes.zip, and similar exceptions. Java throws many exceptions in the normal course of execution, so catching all exceptions causes the debugger to break often.


Exceptions in Targeted Classes

This menu command causes the debugger to break only on exceptions that are thrown by your own classes in the project. Select this menu command if you are interested in breaking on the exceptions thrown by your classes, rather than the exceptions that Java throws in the normal course of execution.


No Exceptions

When you select this menu command, the debugger will not break when exceptions occur.


Toolbar Submenu

The Window Menu has another submenu under it for the Toolbar command. The Toolbar submenu contains all the commands used to customize the toolbars that appear in CodeWarrior IDE windows.

To learn more about how to customize the toolbars, read the information in "Customizing the IDE" on page 289.


Show Window Toolbar

This menu command cause the IDE to display the toolbar in the active window. The actual command shown in the menu will toggle between Show Window Toolbar and Hide Window Toolbar, depending on whether the active window's toolbar is visible or not.


Hide Window Toolbar

This menu command cause the IDE to hide the toolbar in the active window. The actual command shown in the menu will toggle between Show Window Toolbar and Hide Window Toolbar, depending on whether the active window's toolbar is visible or not.


Reset Window Toolbar

This menu command causes the toolbar in the active window to reset to a default state. You should use this menu command if you want to return the Editor window toolbar to its original default settings.


Clear Window Toolbar

This menu command causes the toolbar in the active Editor, Project, or Browser window to have all icons removed from it. Once all the icons have been removed, you can add icons using the Toolbar Elements window.

Use the Reset Window Toolbar command to cause all the default icons to come back.


Show Floating Toolbar

This menu command causes the Floating Toolbar to appear. The actual command shown in the menu will toggle between Show Floating Toolbar and Hide Floating Toolbar, depending on whether the Floating Toolbar is already visible or not.


Hide Floating Toolbar

This menu command causes the Floating Toolbar to disappear. The actual command shown in the menu will toggle between Show Floating Toolbar and Hide Floating Toolbar, depending on whether the Floating Toolbar is already visible or not.


Anchor Floating Toolbar (Mac OS)

This menu command causes the Floating Toolbar to anchor itself to the left edge of the screen, immediately below the menu bar. The actual command shown in the menu will toggle between Anchor Floating Toolbar and Unanchor Floating Toolbar, depending on whether the Floating Toolbar is currently anchored or not.


Unanchor Floating Toolbar (Mac OS)

This menu command causes the Floating Toolbar to unanchor itself from the left edge of the screen, immediately below the menu bar. The actual command shown in the menu will toggle between Anchor Floating Toolbar and Unanchor Floating Toolbar, depending on whether the Floating Toolbar is currently anchored or not.


Reset Floating Toolbar

This menu command causes the Floating Toolbar to return to its default state. You should use this menu command if you want to return the Floating Toolbar to the original default settings.


Clear Floating Toolbar

This menu command causes the Floating Toolbar to have all icons removed from it. Once all the icons have been removed, you can add icons using the Toolbar Elements window.


Apple Menu (Mac OS)

The Apple menu contains one IDE-related item.


About Metrowerks

Choose this item to see the way-cool About Box.


Tools Menu (Mac OS)

The Tools menu contains commands used to do things like start and stop ToolServer. It also contains commands that execute Macintosh Programmer's Workbench (MPW) tools and scripts. Additional commands reference the MPW 411 database.

To learn more about how to use the CodeWarrior command-line tools, refer to the CodeWarrior Command Line Tools manual for more information.

To learn more about ToolServer, refer to Targeting Mac OS.


Start ToolServer

Initiates ToolServer handshaking. If you do not have ToolServer installed on your computer, this command is replaced by Can't Find ToolServer.


Stop ToolServer

When ToolServer is launched, the Stop ToolServer command replaces the Start ToolServer command. Stop ToolServer quits ToolServer and removes the extra ToolServer menu from the CodeWarrior IDE's menu bar.


Commando

This command brings up the Commando dialog box, as shown in Figure 17.2. To learn more about Commando, refer to Targeting Mac OS.

Figure 17.2 Commando Dialog Box


Execute as ToolServer Script

Executes the ToolServer script in the active editor window. For more information, see Targeting Mac OS.


Lookup Symbol

Searches for information about the selected symbol in the MPW 411 database. For more information, see Targeting Mac OS.


Insert Template

Inserts the parameter list template for a function after the selected text. For more information, see Targeting Mac OS.


ToolServer Tools

You can use this submenu to run an MPW tool or script that is installed in the Tools folder of your ToolServer application. To learn more about ToolServer, refer to Targeting Mac OS.


Scripts Menu (Mac OS)

The Script menu, shown in Figure 17.3, contains a list of the AppleScripts in the (Scripts) folder.

This menu will only appear if the Use Script Menu setting is turned on in the IDE Extras preference panel. Also, this menu will only be shown if the (Scripts) folder is present in your Metrowerks CodeWarrior folder. To learn more about how to configure the appropriate preferences, refer to "IDE Extras" on page 254.

To learn more about AppleScripts and scripting the CodeWarrior IDE, refer to Targeting Mac OS.

To learn about what the individual scripts do, open them with a text editor or an AppleScript editor application.

Figure 17.3 The Script menu


Note that the menu is hierarchical, based on the directory structure of the (Scripts) folder. You may place scripts in the (Scripts) folder inside other directories to create a hierarchical menu.


Open Scripts Folder

Brings the Finder to the front and opens the (Scripts) folder. This command is always available if the Script menu is active.


Other Script menu items

The other items in this menu are the names of the AppleScripts in the (Scrips) folder. If you do not have any AppleScripts, no items are listed.


Editor Extensions Menu (Mac OS)

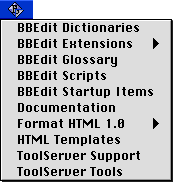
The Editor Extensions menu (Figure 17.4) is similar to the Script Menu. If the Use BBEdit Extensions preference is enabled, a list of BBEdit extensions are added to the menu bar. You must have an alias or folder called (Editor Extensions), including the parentheses, in the same folder as the CodeWarrior IDE application. Place the editor extensions that you wish to use inside the (Editor Extensions) folder. You can also place aliases of the editor extensions inside the (Editor Extensions) folder.

To learn more about how to configure the appropriate preferences so this menu becomes visible, refer to "IDE Extras" on page 254.

For more information about BBEdit, refer to the documentation that came with the product.

Figure 17.4 Editor Extensions menu


Info Menu (Solaris)

The Info menu (Figure 17.5) is contains the following menu items:


About Metrowerks

Choose this item to see the Metrowerks CodeWarrior about box.


About CodeWarrior Latitude

Choose this item to see the CodeWarrior Latitude about box.

Figure 17.5 Solaris Info menu


Copy Files

This item launches a desk accessory which enables you to copy files and folders. From within the CodeWarrior IDE, you can copy files and folders between file systems or devices accessible from your Solaris environment. See "Copy Files Accessory" on page 659. for a detailed description of this accessory.


File Systems

This facility allows you to mount volumes from within the CodeWarrior IDE. For more information on using this facility, refer to "File Systems Facility" on page 662.


Keyboard Preferences

Use this command to display the Keyboard Preferences dialog box where you can change the default modifier key mappings. To learn more about this settings panel, refer to "Keyboard Preferences Dialog Box" on page 667.


IDE Default Key Bindings

This section describes the default key bindings assigned to commands in the CodeWarrior IDE.

CodeWarrior does not assign default key bindings to all of the available commands, so their respective key-binding lists appear blank. You can assign key bindings to any command. For more information about key bindings, see "Customizing Key Bindings" on page 297.

The key-binding sections include:


Mac OS, Solaris, and Linux Modifier Key Legend

Modifier keys are used in combination with other keys to generate key bindings. For instance, to execute the Ctrl/Command - N keyboard shortcut, you first press the Ctrl or Command modifier key, and while holding it down, press the N key on your keyboard. For Mac OS-, Solaris-, and Linux-hosted versions of the CodeWarrior IDE, symbols are used to represent modifier keys in menus as well as the Customize IDE Commands window. The legend in Table 17.1 describes how these symbols correspond to their associated names on Mac OS, Solaris, and Linux platforms.

Table 17.1 Mac OS, Solaris, and Linux modifier key legend

Symbol
Mac OS
Solaris and Linux
Command key
Meta key
Option key
Alt key
Shift key
Shift key
Control key
Control key


NOTE

(Solaris and Linux) You can change modifier key mappings via the Keyboard Preferences dialog box. See "Keyboard Preferences Dialog Box" on page 667 for more information on changing the default mappings.

File Menu

Table 17.2 contains the default key bindings for manipulating projects and files from within the CodeWarrior IDE.

Table 17.2 File menu key bindings

Command
Windows
Mac OS
Solaris and Linux
New Text File
Ctrl-N
Command-N
Meta-N
New
Ctrl-Shift-N
Shift-Command-N
Shift-Meta-N
New Project
New Empty Project
Open
Ctrl-O
Command-O
Meta-O
Open Recent
Find and Open
`selection'
Ctrl-D
Command-D
Meta-D
Find and Open File
Ctrl-Shift-D
Option-
Command-D
Alt-
Meta-D
Close
Ctrl-W
Command-W
Meta-W
Close All
Ctrl-Shift-W
Option-
Command-W
Alt-
Meta-W
Save
Ctrl-S
Command-S
Meta-S
Save All
Ctrl-Shift-S
Option-
Command-S
Alt-
Meta-S
Save As
Save A Copy As
Revert
Import Components
Close Catalog
Import Project
Export Project
Page Setup
Print
Ctrl-P
Command-P
Meta-P
Quit
Command-Q
Meta-Q


Edit Menu

Table 17.3 contains the default key bindings for the commands in the Edit menu of the CodeWarrior IDE.

Table 17.3 Edit key bindings

Command
Windows
Mac OS
Solaris and Linux
Undo
Ctrl-Z
Command-Z
Meta-Z
Redo
Ctrl-Shift-Z
Shift-Command-Z
Shift-Meta-Z
Cut
Ctrl-X
Command-X
Meta-X
Copy
Ctrl-C
Command-C
Meta-C
Paste
Ctrl-V
Command-V
Meta-V
Clear
Clear
Delete
Del
Select All
Ctrl-A
Command-A
Meta-A
Balance
Ctrl-B
Command-B
Meta-B
Shift Left
Ctrl-[
Command-[
Meta-[
Shift Right
Ctrl-]
Command-]
Meta-]
Insert Reference Template
Preferences
Target Settings
Version Control Settings
Commands & Key Bindings


Search Menu

Table 17.4 contains the default key bindings for the commands in the Search menu of the CodeWarrior IDE.

Table 17.4 Search key bindings

Command
Windows
Mac OS
Solaris and Linux
Find
Ctrl-F
Command-F
Meta-F
Find Next
F3
Command-G
Meta-G
Find Previous
Shift-
Command-G
Shift-
Meta-G
Find in Next File
Ctrl-T
Command-T
Meta-T
Find in Previous File
Shift-
Command-T
Shift-
Meta-T
Enter Find String
Ctrl-E
Command-E
Meta-E
Enter Replace String
Shift-
Command-E
Shift-
Meta-E
Find Selection
Ctrl-F3
Command-H
Meta-H
Find Previous
Selection
Shift-
Command-H
Shift-
Meta-H
Replace
Ctrl-=
Command-=
Meta-=
Replace & Find Next
Ctrl-L
Command-L
Meta-L
Replace & Find
Previous
Shift-
Command-L
Shift-
Meta-L
Replace All
Find Definition
Ctrl-'
Command-'
Meta-'
Find Definition & Reference
Option-
Command-'
Alt-
Meta-'
Find Reference
Shift-
Command-'
Shift-
Meta-'
Go Back
Ctrl-Shift-B
Shift-
Command-B
Shift-
Meta-B
Go Forward
Ctrl-Shift-F
Shift-
Command-F
Shift-
Meta-F
Go to Line
Ctrl-,
Command-,
Meta-,
Compare Files
Apply Difference
Unapply Difference


Project Menu

Table 17.5 contains the default key bindings for managing projects, controlling compilations, and much more.

Table 17.5 Project key bindings

Command
Windows
Mac OS
Solaris and Linux
Add Window
Add Files
Create Group/
Segment/Target
Check Syntax
Ctrl-;
Command-;
Meta-;
Preprocess
Precompile
Compile
Ctrl-F7
Command-K
Meta-K
Disassemble
Bring Up To Date
Ctrl-U
Command-U
Meta-U
Make
F7
Command-M
Meta-M
Stop Build
Ctrl-Break
Command-.
Meta-.
Remove Object Code
Ctrl - -
Command - -
Meta - -
Remove Object Code & Compact
Option -
Command - -
Alt -
Meta - -
Re-search For Files
Reset Project Entry Paths
Synchronize
Modification Dates
Enable Debugging
Run/Debug
F5
Command-R
Meta-R
Debug/Run
Ctrl-F5
Option-
Command-R
Alt-
Meta-R
Set Default Project
Set Default Target


Debug Menu

Table 17.6 contains the default key bindings for handling commands on the Debug menu in the CodeWarrior IDE.

Table 17.6 Debug menu key bindings

Command
Windows
Mac OS
Solaris and Linux
Kill
Shift-F5
Control-K
Control-K
Restart
Ctrl-Shift-F5
Reset
Hard Reset
Step Over
F10
Control-S
Control-S
Step Into
F11
Control-T
Control-T
Step Out
Shift-F11
Control-U
Control-U
Stop
Set/Clear
Breakpoint
F9
Enable/Disable Breakpoint
Ctrl-F9
Clear All
Breakpoints
Show/Hide
Breakpoints
Set/Clear
Watchpoint
Enable/Disable
Watchpoint
Clear All
Watchpoints
Break on C++ Exception
Break on Java Exception
Process Attach
Switch to Monitor


Data Menu

Table 17.7 contains the default key bindings for handling debugger variable displays in the IDE.

Table 17.7 Data menu key bindings

Command
Windows
Mac OS
Solaris and Linux
Show Types
New Expression
Alt-N
Control-N
Control-N
Copy To
Expression
View As
Control-Y
View Variable
View Array
Control-A
Control-A
View Memory
Control-M
Control-M
View Memory As
View As Default
View As Signed Decimal
Alt-Shift-D
Control-Shift-D
Control-Shift-D
View As Unsigned Decimal
Alt-Shift-U
Control-Shift-U
Control-Shift-U
View As
Hexadecimal
Alt-Shift-H
Control-Shift-H
Control-Shift-H
View As Character
Alt-Shift-C
Control-Shift-C
Control-Shift-C
View As C String
Alt-Shift-S
Control-Shift-S
Control-Shift-S
View As Pascal String
Alt-Shift-P
Control-Shift-P
Control-Shift-P
View As Unicode String
Alt-Shift-O
Control-Shift-O
Control-Shift-O
View As Floating Point
Alt-Shift-F
Control-Shift-F
Control-Shift-F
View As
Enumeration
Alt-Shift-E
Control-Shift-E
Control-Shift-E
View As Fixed
Control-Shift-I
Control-Shift-I
View As Fract
Control-Shift-R
Control-Shift-R


Browser Menu

Table 17.8 contains the default key bindings for use with the class browser in the CodeWarrior IDE.

Table 17.8 Browser menu key bindings

Command
Windows
Mac OS
Solaris and Linux
New Class
New Member Function
New Data Member
New Property
New Method
New Event Set
New Event


Miscellaneous

Table 17.9 contains the default key bindings for handling miscellaneous tasks in the CodeWarrior IDE.

Table 17.9 Miscellaneous key bindings

Command
Windows
Mac OS
Solaris and Linux
Quote Key
Go to Header/Source File
Ctrl-\Q
Command-\Q
Meta-\Q
Go to Previous Error Message
Shift-F4
Option-
Command-
Up Arrow
Alt-
Meta-
Up Arrow
Go to Next
Error Message
F4
Option-
Command-
Down Arrow
Alt-
Meta-
Down Arrow
Run Script
Stop Script


Editor Commands

Table 17.10 contains the default key bindings for handling Editor windows in the CodeWarrior IDE.

Table 17.10 Editor window key bindings

Command
Windows
Mac OS
Solaris and Linux
Move Character Left
Left Arrow
Left Arrow
Left Arrow
Move Character Right
Right Arrow
Right Arrow
Right Arrow
Move Word Left
Ctrl-Left Arrow
Option-Left Arrow
Alt-Left Arrow
Move Word Right
Ctrl-Right Arrow
Option-Right Arrow
Alt-Right Arrow
Move Sub-word Left
Control-Left Arrow
Control-Left Arrow
Move Sub-word Right
Control-
Right Arrow
Control-
Right Arrow
Move to Start of Line
Home
Command-
Left Arrow
Meta-
Left Arrow
Move to End of Line
End
Command-
Right Arrow
Meta-
Right Arrow
Move Line Up
Up Arrow
Up Arrow
Up Arrow
Move Line Down
Down Arrow
Down Arrow
Down Arrow
Move to Top of Page
Page Up
Option-Up Arrow
Alt-Up Arrow
Move to Bottom of Page
Page Down
Option-
Down Arrow
Alt-
Down Arrow
Move to Top of File
Ctrl-Home
Command-
Up Arrow
Meta-
Up Arrow
Move to Bottom of File
Ctrl-End
Command-
Down Arrow
Meta-
Down Arrow
Delete Character Left
Backspace
Delete
Delete
Delete Character Right
Del
del
del
Delete to End of File
Character Select Left
Shift-Left Arrow
Shift-Left Arrow
Shift-Left Arrow
Character Select Right
Shift-Right Arrow
Shift-Right Arrow
Shift-Right Arrow
Select Word Left
Ctrl-Shift-
Left Arrow
Option-Shift-
Left Arrow
Alt-Shift-
Left Arrow
Select Word Right
Ctrl-Shift-
Right Arrow
Option-Shift-
Right Arrow
Alt-Shift-
Right Arrow
Select Sub-word Left
Control-Shift-
Left Arrow
Control-Shift-
Left Arrow
Select Sub-word Right
Control-Shift-
Right Arrow
Control-Shift-
Right Arrow
Select Line Up
Shift-Up Arrow
Shift-Up Arrow
Shift-Up Arrow
Select Line Down
Shift-Down Arrow
Shift-Down Arrow
Shift-Down Arrow
Select to Start of Line
Shift-Home
Shift-Command-Left Arrow
Shift-Meta-Left Arrow
Select to End of Line
Shift-End
Shift-Command-Right Arrow
Shift-Meta-Right Arrow
Select to Start of Page
Shift-Page Up
Option-Shift-
Up Arrow
Alt-Shift-
Up Arrow
Select to End of Page
Shift-Page Down
Option-Shift-
Down Arrow
Alt-Shift-
Down Arrow
Select to Start of File
Ctrl-Shift-Home
Shift-Command-Up Arrow
Shift-Meta-Up Arrow
Select to End of File
Ctrl-Shift-End
Shift-Command-Down Arrow
Shift-Meta-Down Arrow
Scroll Line Up
Ctrl-Up Arrow
Control-Up Arrow
Control-Up Arrow
Scroll Line Down
Ctrl-Down Arrow
Control-
Down Arrow
Control-
Down Arrow
Scroll Page Up
Page Up
Page Up
Scroll Page Down
Page Down
Page Down
Scroll to Top of File
Home
Home
Scroll to End of File
End
End
Scroll to Selection
Enter
Find Symbols with Prefix
Ctrl-\
Control-\
Control-\
Find Symbols with Substring
Ctrl-Shift-\
Control-Shift-\
Control-Shift-\
Get Next Symbol
Ctrl-.
Control-.
Control-.
Get Previous
Symbol
Control-,
Control-,


Catalog

Table 17.11 contains the default key bindings for use with the CodeWarrior class browser.

Table 17.11 Catalog key bindings

Command
Windows
Mac OS
Solaris and Linux
New Catalog
New Folder
Open Catalog
Toggle Index View
Edit Item Properties


Layout Menu

Table 17.12 contains the default key bindings for use with the CodeWarrior RAD layout editor.

Table 17.12 Layout menu key bindings

Command
Windows
Mac OS
Solaris and Linux
Align
Resize
Display Grid
Snap To Grid
Group
Ungroup
Customize
Properties


Window Menu

Table 17.13 contains the default key bindings for handling many common windows in the CodeWarrior IDE.

Table 17.13 Window menu key bindings

Command
Windows
Mac OS
Solaris and Linux
Stack Editor Window
Tile Editor Window
Tile Editor Windows Vertically
Zoom Window
Ctrl-/
Command-/
Meta-/
Collapse/Expand
Window
Save Default
Window
Toolbar
Browser Contents
Class Hierarchy
Window
Single Class Hierarchy Window
New Class Browser
Build Progress
Window
Errors & Warnings Window
Command-I
Meta-I
Project Inspector
ToolServer
Worksheet
Processes Window
Expressions
Window
Global Variables Window
Breakpoints
Window
Watchpoints
Window
Register Windows
Component Catalog
Component Palette
Object Inspector
Select Default Project
Ctrl-0
Command-0
Meta-0
Select Document 1
Ctrl-1
Command-1
Meta-1
Select Document 2
Ctrl-2
Command-2
Meta-2
Select Document 3
Ctrl-3
Command-3
Meta-3
Select Document 4
Ctrl-4
Command-4
Meta-4
Select Document 5
Ctrl-5
Command-5
Meta-5
Select Document 6
Ctrl-6
Command-6
Meta-6
Select Document 7
Ctrl-7
Command-7
Meta-7
Select Document 8
Ctrl-8
Command-8
Meta-8
Select Document 9
Ctrl-9
Command-9
Meta-9


Visit the Metrowerks website at: http://www.metrowerks.com
For assistance contact Metrowerks Technical Support at: support@metrowerks.com
Copyright © 1999, Metrowerks Corp. All rights reserved.

Last updated: May 24, 1999 * Chris Magnuson * John Roseborough